If your permission slips go home in backpacks, you probably spend the week before every trip chasing the missing ones. The slips that do come back are often crumpled or missing a signature.
This guide gives you a free permission slip template to copy, plus a digital version parents can fill in and sign on their phone, so you know who’s coming before the bus leaves.
Create Your Permission Slip Form Now! 🙂
How to Create a Permission Slip Template Parents Can Sign Online
With a digital permission slip, you send parents a link instead of a sheet of paper. They fill it in on their phone and sign with a finger or by typing their name, and each signed slip shows up in your WordPress dashboard as soon as they submit it.
The same setup works for a school trip, a church youth retreat, a club’s away game, or a week at summer camp. I’d go digital for any trip with more than a handful of kids, because every online permission slip lands in one list and you can see who’s still missing on a single screen.
How to Write a Permission Slip (Free Template)
Whether you call it a field trip permission slip or a camp permission form, a good one answers the same questions. You fill in the trip details once, and each parent fills in everything about their own child.
Use this checklist to write your own, or copy the permission slip template right below it. Every permission slip should cover these 10 points.
- The organization’s name and the activity
- The date, the start and end times, and the location
- How participants get there and who’s supervising
- The cost, if any, and what to bring
- The child’s name and class or group
- A parent or guardian’s name, phone number, and email
- An emergency contact other than the parent
- Allergies, medications, and other health needs
- A clear consent statement
- The parent or guardian’s signature and the date
Before you send it, check the wording against your school’s or organization’s own rules. Paper slips still work, and a few families will always prefer one.
For everyone else, choosing between an online form or a fillable PDF comes down to who does the paperwork. A PDF has to be downloaded and sent back, while an online form only needs a tap on a link and a signature on the screen.
Step 1: Install the WPForms Pro Plugin
WPForms gives you a drag and drop form builder for WordPress with 2,100+ form templates, including a full set of education form templates for schools and youth groups.
The Permission Slip Form template is one of them, and it gets you most of the way to a finished slip before you touch a single field.
What I like most about using it for permission slips is that every signed slip stays on your own site, with no separate e-signature service charging you per signature.
The Permission Slip Form template and the Signature field that lets you collect signatures from any device are both part of WPForms Pro, along with the Form Locker addon for deadlines.
Basic covers conditional logic and stored entries, and the free Lite version can still handle a simple checkbox slip, which the FAQ explains.
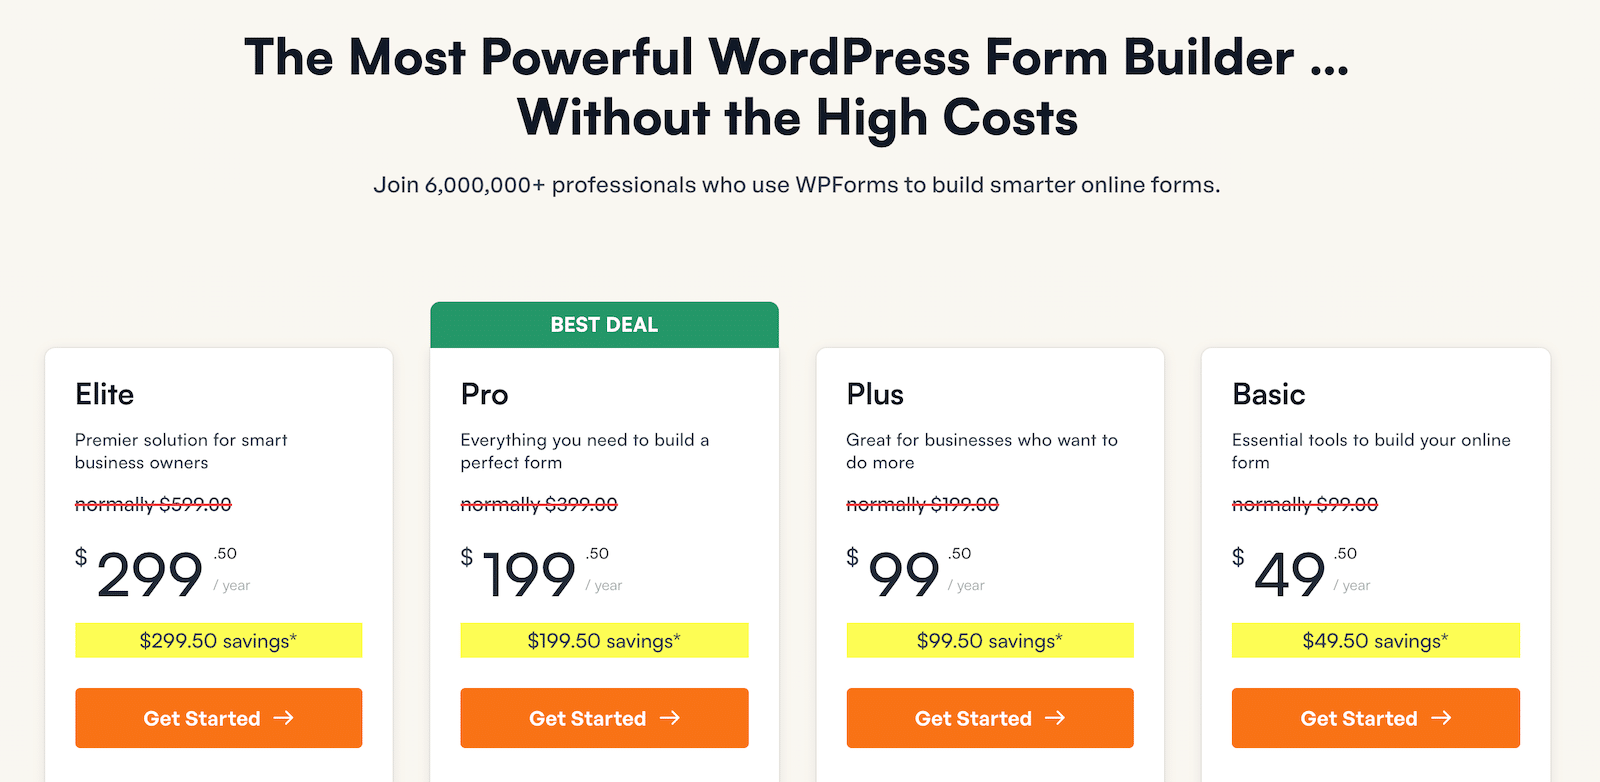
To get started, buy the Pro license. Then, install WPForms on your website. If you need help, follow these instructions on how to add a plugin to WordPress.
Step 2: Create Your Slip From the Permission Slip Form Template
Go ahead and open WPForms » Add New, which takes you straight to the template library. In the template search box, type “permission slip” to narrow the library down.
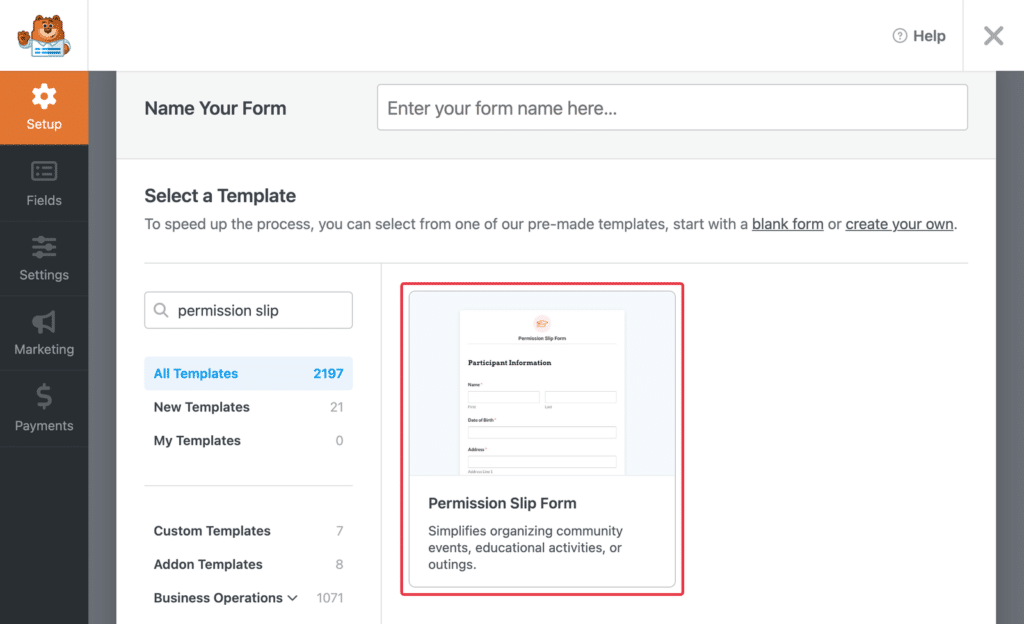
Hover over the Permission Slip Form card and click Use Template. If the Signatures addon isn’t active yet, WPForms offers to install and activate it for you.
Confirm, and the template loads with its signature field ready to use. The builder opens with every field already on the canvas.
Scroll down to the Permission for Activity section to see the Permission Granted or Denied choice and the signature pad.
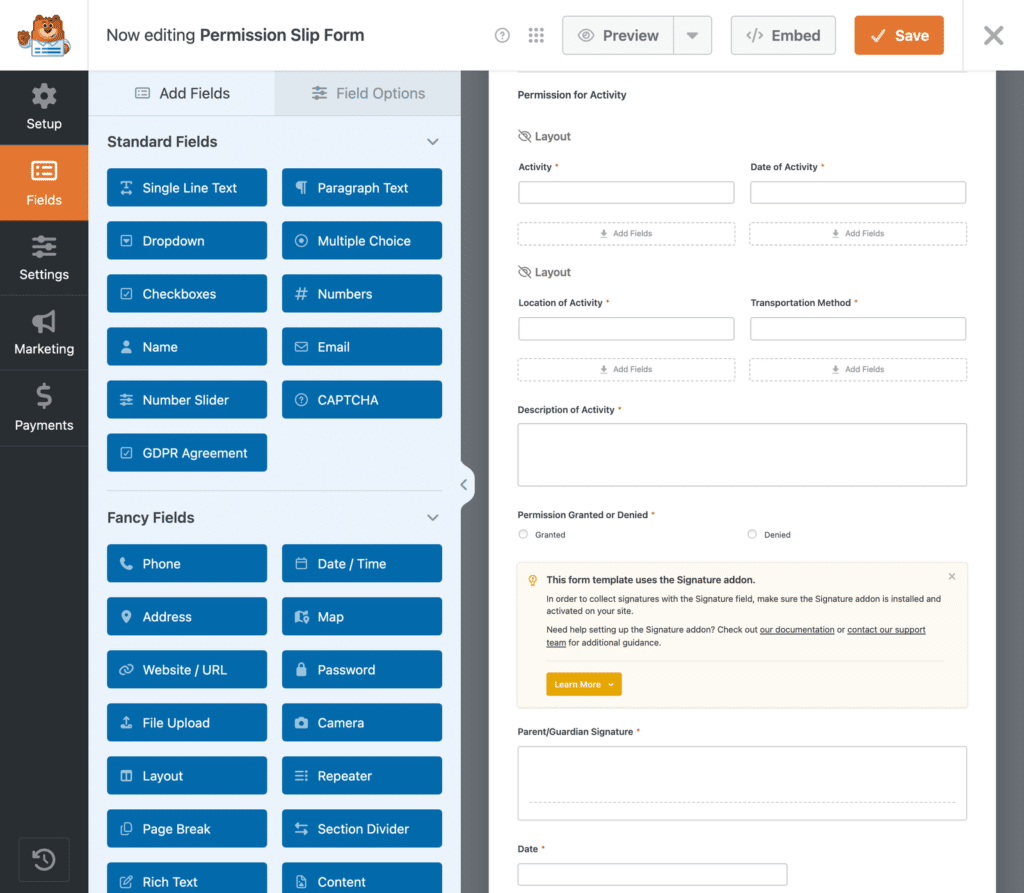
The yellow note above the signature pad is an Internal Information field that only shows in the builder, so parents never see it. Click its × to dismiss it once you’ve read it.
The template splits the slip into two sections.
- Participant Information: The child’s name, date of birth, and address, plus a parent or guardian’s name, email, and phone, and an emergency contact.
- Permission for Activity: The activity with its date, location, and transportation, a description, a Granted or Denied choice, the parent’s signature, and the date.
You can also see the whole slip the way a parent would on the Permission Slip Form template page, which has a live preview.
For school outings, the Field Trip Permission Form template is another good starting point.
Step 3: Customize the Slip for Your Trip
These changes make the slip specific to your trip and short enough to finish on a phone.
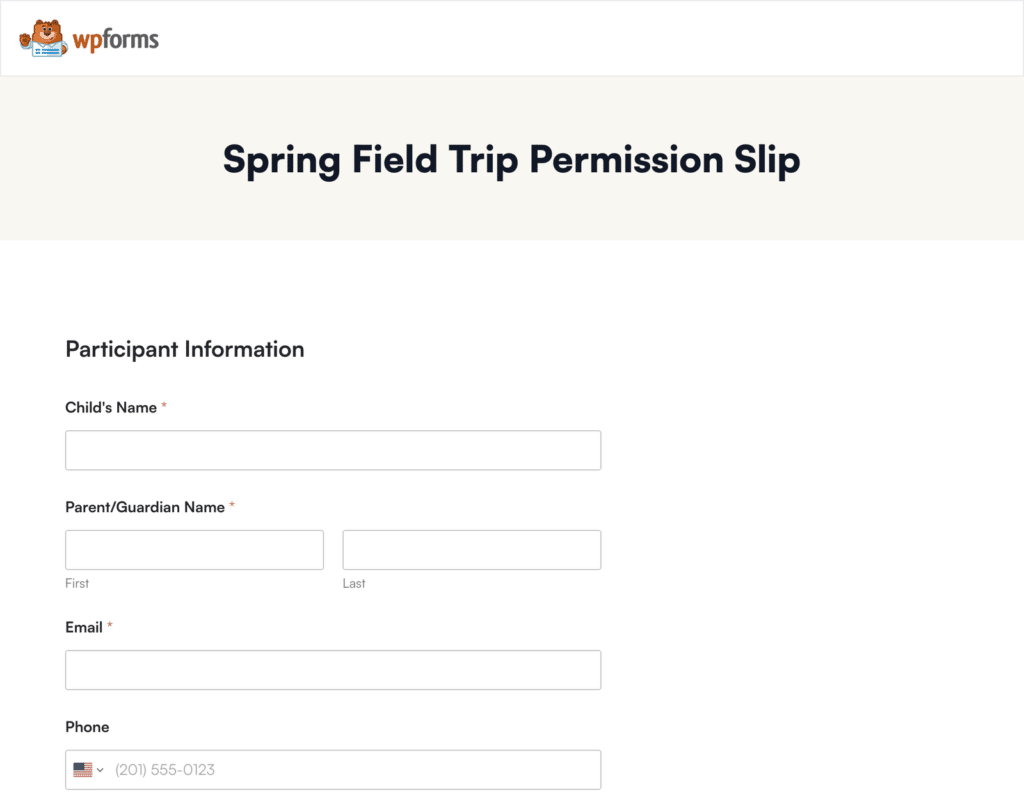
Start in Settings » General by changing the Form Name to something parents will recognize, like Spring Field Trip Permission Slip. Then go back to Fields and click the Activity field.
On its Advanced tab, type the trip’s name into Default Value and switch on Read-Only. Parents will see the trip but can’t change it, and it’s still saved with every entry.
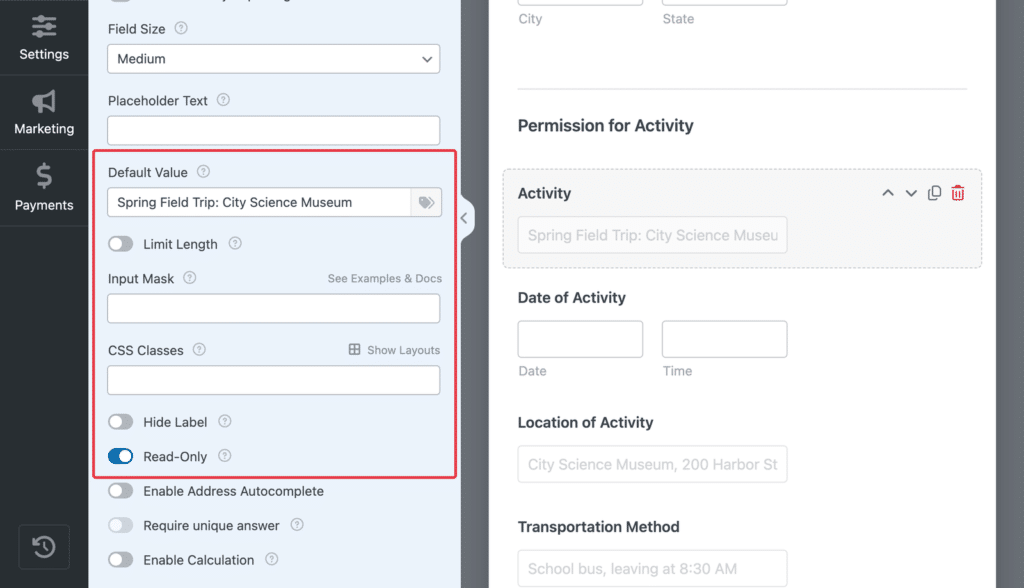
Do the same for the Location of Activity and Transportation Method fields.
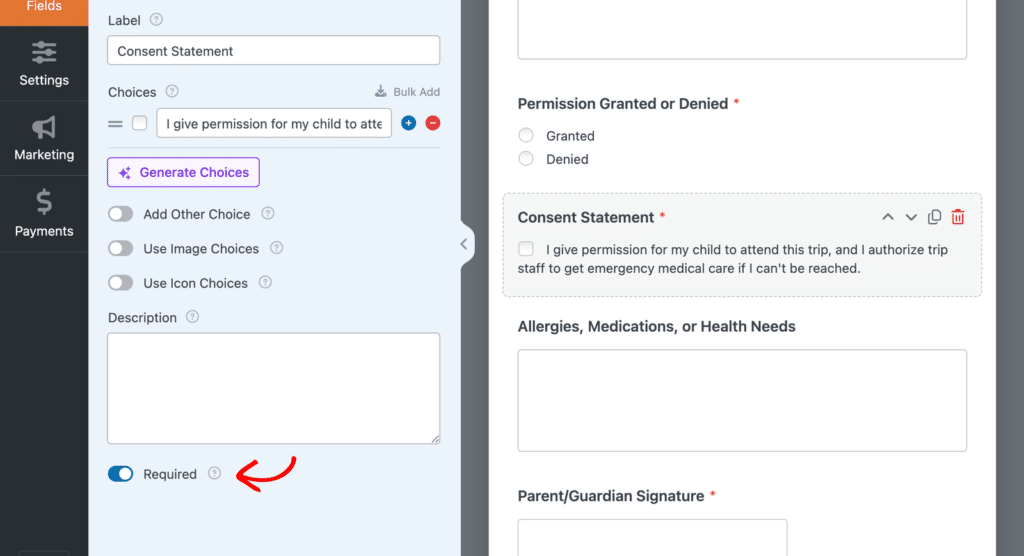
Now drag a Checkboxes field onto the canvas just below Permission Granted or Denied and label it Consent Statement.
Delete two of the default choices and type your permission wording into the one that’s left, including permission for emergency medical care. Then switch on Required to make the box impossible to skip.
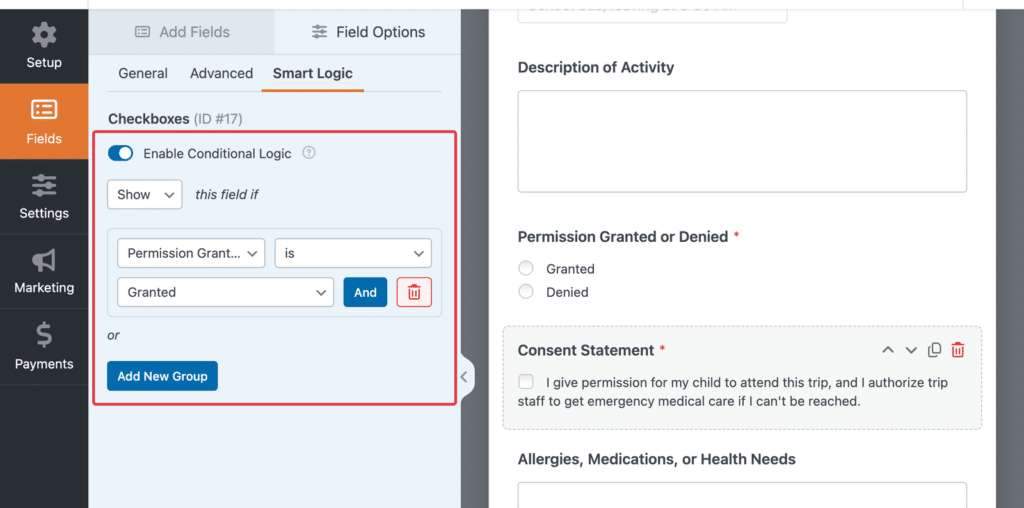
A parent who picks Denied shouldn’t have to agree to a trip they’ve turned down. Open the field’s Smart Logic tab and switch on Enable Conditional Logic.
Set the rule to Show this field if Permission Granted or Denied is Granted. Conditional logic needs WPForms Basic or higher.
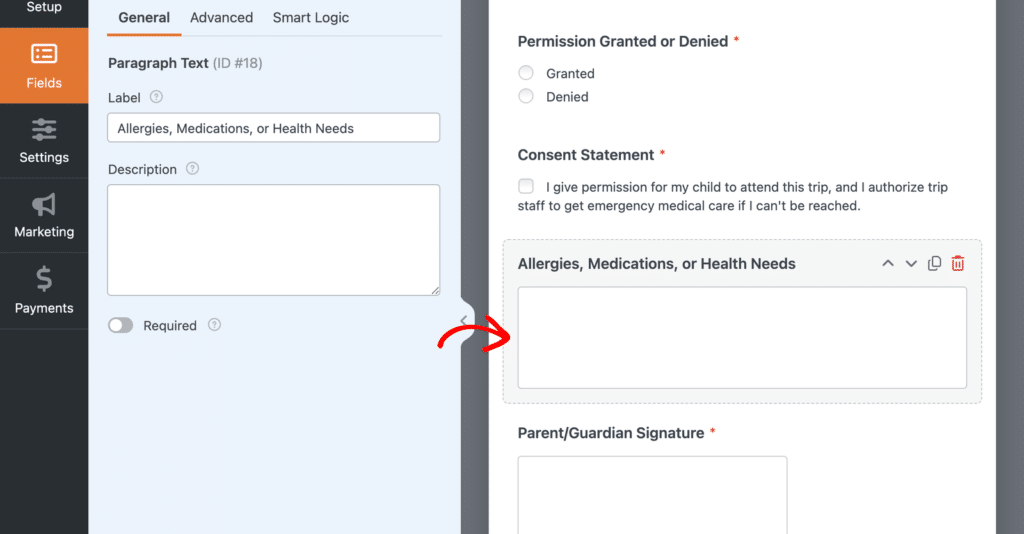
Finally, add a Paragraph Text field below the consent statement and label it Allergies, Medications, or Health Needs. Leave it optional, since plenty of kids won’t have anything to list.
For a quicker slip on a phone, rename the first Name field to Child’s Name so no parent types their own name there, then set its Format to Simple for a single box.
You can also delete Date of Birth or Address if you already have them on file. Because Date of Activity has no default value, let parents confirm the date or swap it for a Single Line Text field you can lock the same way.
Step 4: Set Up the Parent Signature Field
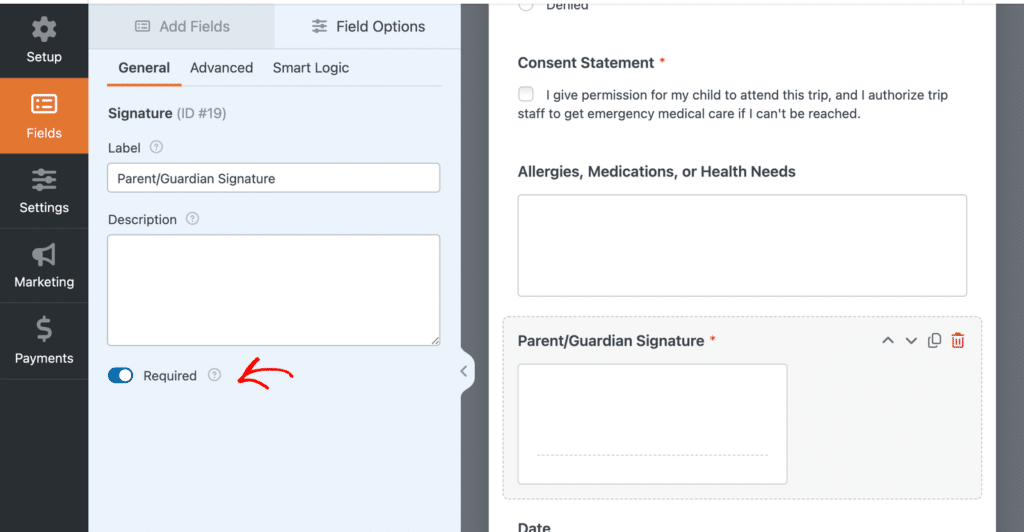
The template already includes a Parent/Guardian Signature field, and only two of its settings need your attention.
Click that field on the canvas to open its options. Make sure Required is switched on to stop unsigned slips from coming through.
Next, open the Advanced tab and find the Input Method dropdown. It gives parents two ways to sign.
- Draw: The default, where parents sign with a finger on a phone or a mouse on a computer.
- Type: Parents type their name, and WPForms turns it into a handwriting-style signature saved as an image.
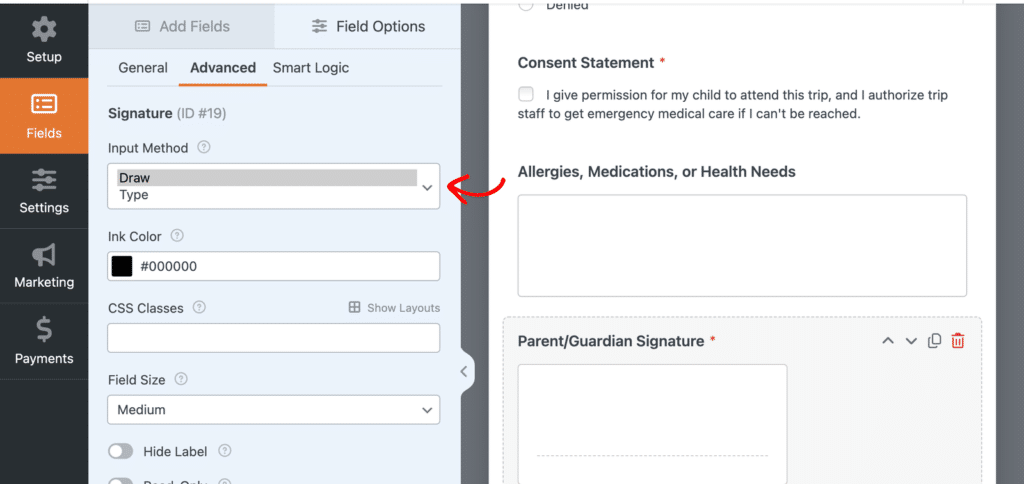
I’d stick with Draw for permission slips, since most parents will sign on a phone. Type suits families who fill things in on a computer, and typed signatures show up just like drawn ones in your entries and emails.
The Ink Color option on the same tab only changes drawn signatures, and you can skip it if you choose Type. Click Save to keep your changes. Then click Preview and sign the slip yourself, the way a parent will.
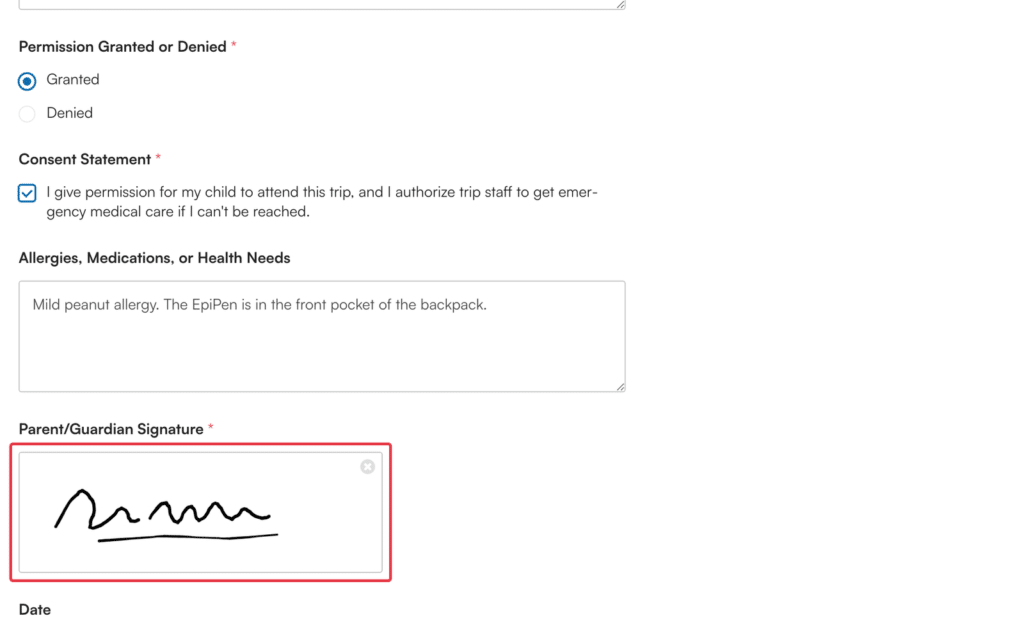
Each signature is saved as a PNG image with the rest of the entry. The Signature addon documentation covers every option if you want more detail.
Step 5: Send Parents a Copy of the Signed Slip
By the end of this step, every signed slip sends two emails, one to you and a copy to the parent.
Open Settings » Notifications in the builder, where the default notification already emails you whenever a parent submits the slip.
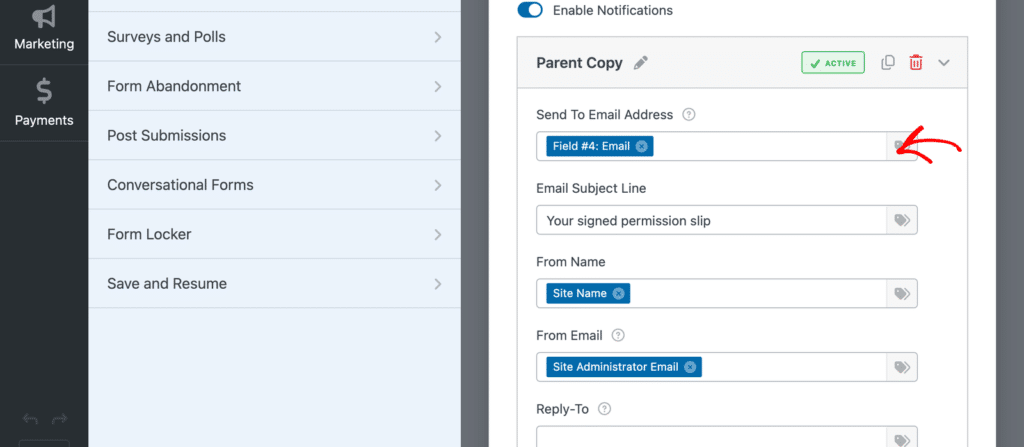
Click Add New Notification and call it Parent Copy. Then, in Send To Email Address, click Show Smart Tags and choose the Email field to send the copy to whoever filled in the slip.
Scroll down to the Email Message box and leave the {all_fields} smart tag in place. It lists every answer on the slip and embeds the parent’s signature right in the email.
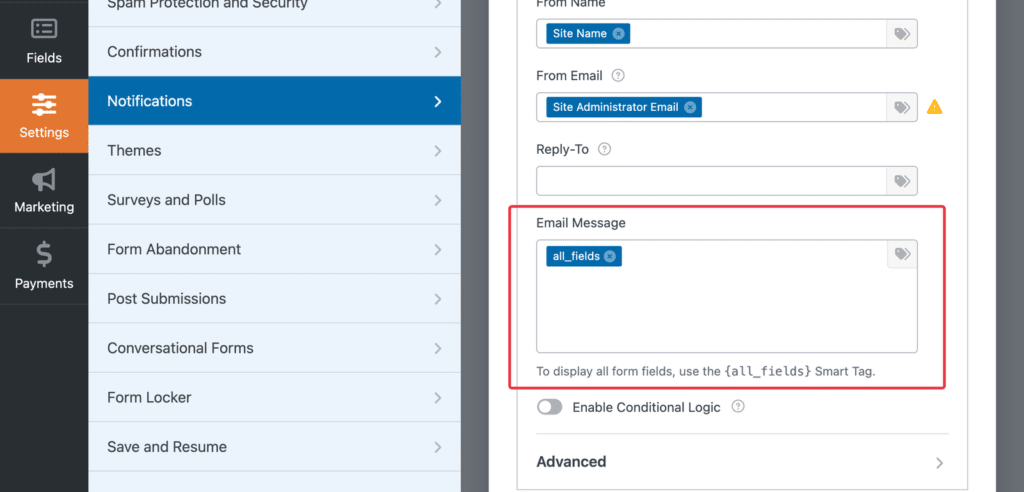
A second notification needs WPForms Basic or higher. Lite gives you one notification per form, and it’s best pointed at your own inbox.
The doc on how to send a copy to the person who filled out the form covers the extra options.
Over in Settings » Confirmations, keep the Message type and write a short thank-you telling parents their copy is on its way.
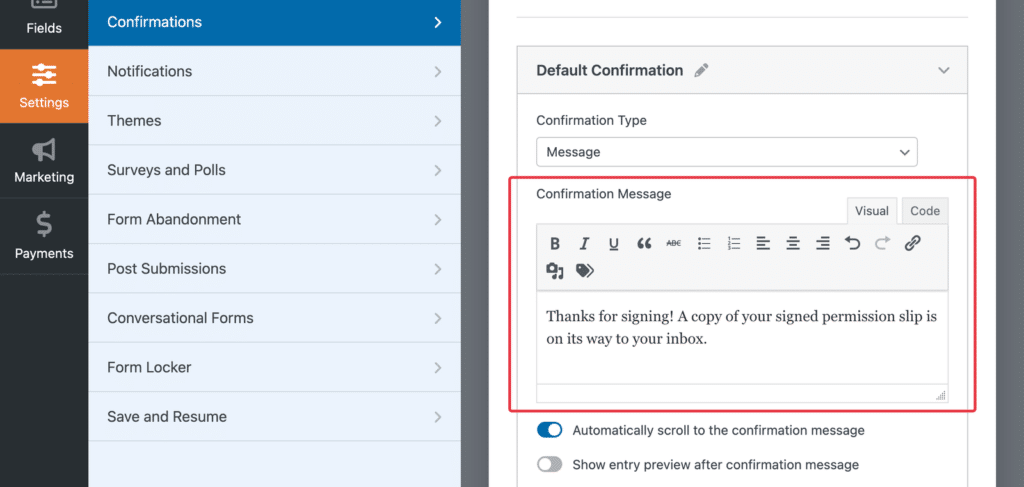
Click Save before you move on.
Step 6: Share the Permission Slip With Parents
Your slip needs a page of its own before parents can open it.
With the form still open, click Embed in the builder header and choose Create New Page when WPForms offers an existing or new page.
Type a name for the page, such as Spring Field Trip Permission Slip, and click Create Page.
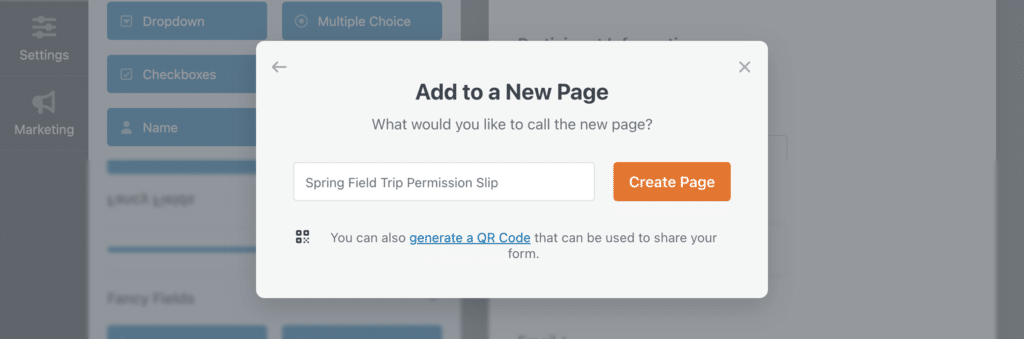
Publish the page, then open it the way a parent would. Its link is your online permission slip, and it can go anywhere families already read your messages, from a newsletter to a text.
For families who still read paper first, add a QR code to the note that goes home. Back in the builder, open Settings » General and set QR Code to Page.
Choose your slip’s page in Destination Page, then click Generate QR Code. The list only shows published pages, and yours went live a moment ago.
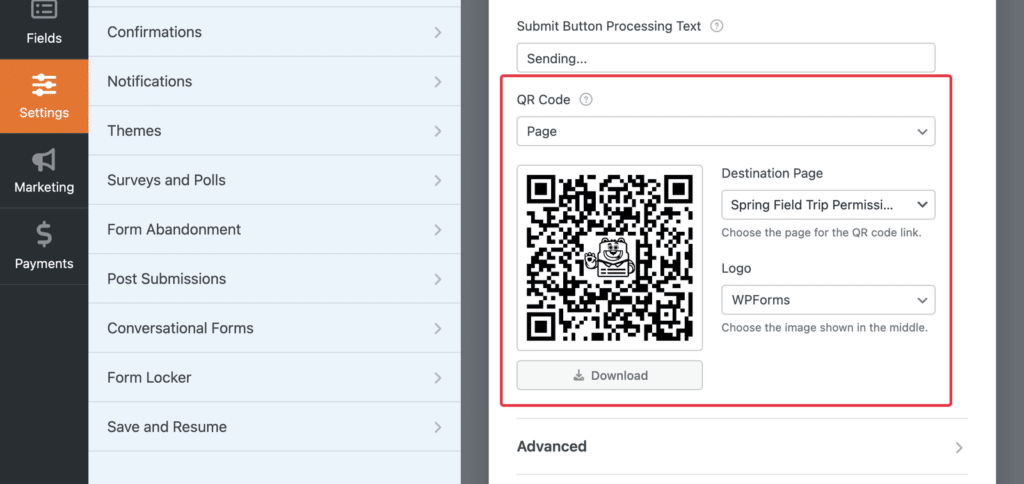
Click Download and choose SVG Vector, which stays sharp at any print size. QR codes come with every WPForms plan, including Lite, and the docs explain how to generate a QR code for your form in more detail.
Step 7: Track Returned Slips and Set a Deadline
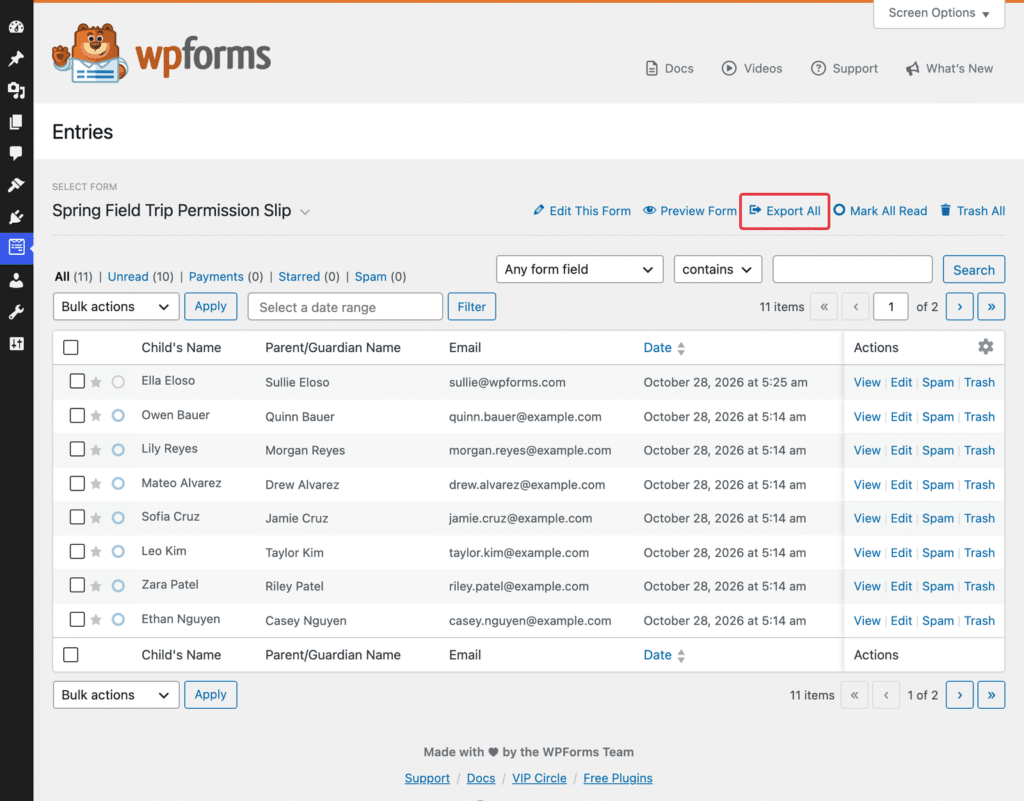
Returned slips land in one place, and Form Locker can close the slip for you once your deadline passes. Go to WPForms » Entries and click your slip’s name to see every returned slip, one row per child.
To build a roster, click Export All above the table. That opens the export screen with your slip already selected. From there, you can export your entries to a CSV file and sort them by Granted or Denied in a spreadsheet.
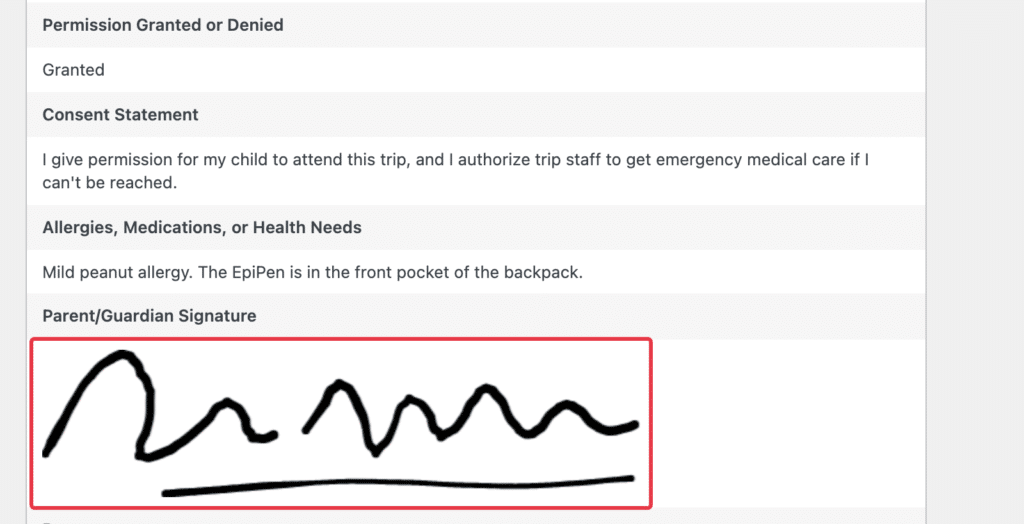
Click View on any entry to see every answer on the slip, right down to the parent’s signature image.
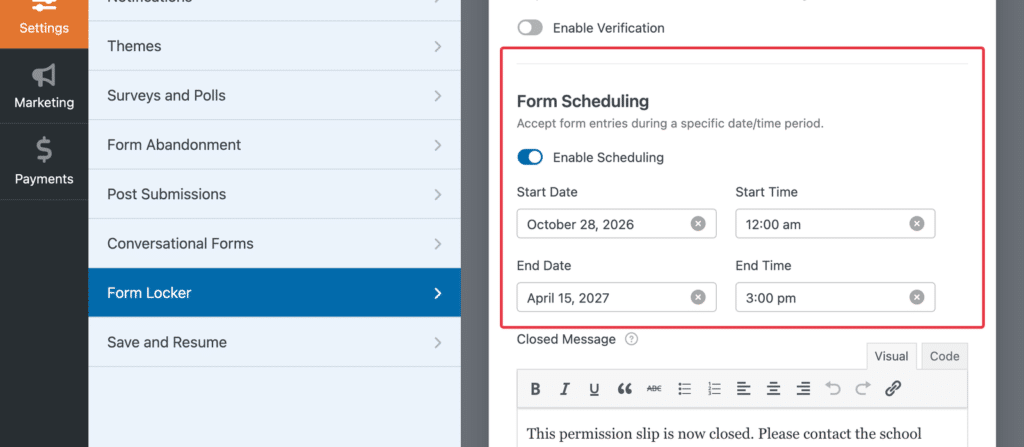
A deadline keeps late slips off a bus list you’ve already finalized. In the builder, open Settings » Form Locker and switch on Enable Scheduling, which comes with the Form Locker addon in WPForms Pro.
Set the End Date to the day before the trip, then add a Closed Message telling late families who to contact.
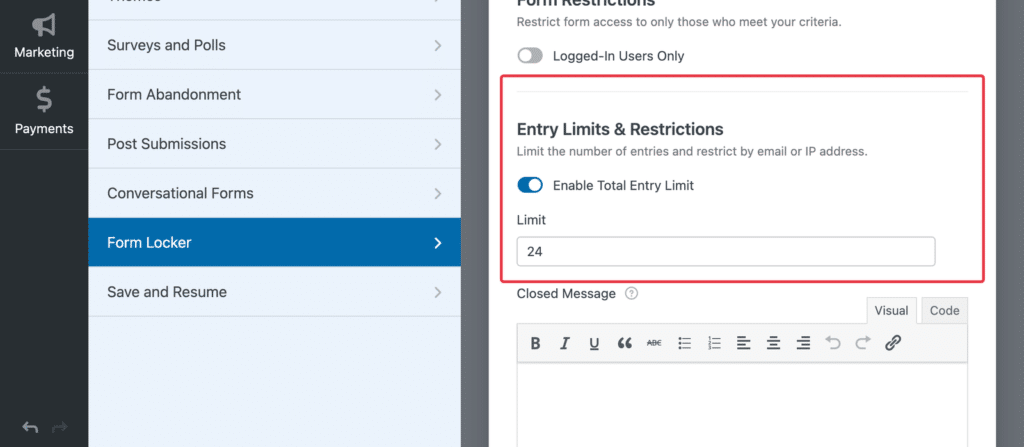
If seats are limited, scroll down to Entry Limits & Restrictions and switch on Enable Total Entry Limit. Set the Limit to the number of seats you have, and the form stops taking slips once it’s full.
And that’s it! Your permission slip is now collecting signatures.
Start Collecting Signed Permission Slips Today! 🙂
What is a permission slip?
A permission slip is a short form a parent or guardian signs before their child goes on a trip or takes part in an activity away from the usual routine. It confirms the parent knows where their child will be and with whom, and it gives staff someone to call in an emergency.
Is a permission slip legally binding?
In practice, a permission slip records that a parent understood the activity and agreed to it.
In the United States, the federal ESIGN Act and the Uniform Electronic Transactions Act that most states have adopted give electronic signatures the same legal standing as handwritten ones for most records.
Liability waivers are a separate question, and many states limit what a parent can waive on a child’s behalf. Since this isn’t legal advice, follow your school’s or organization’s policy and have a lawyer review any waiver wording.
You can also read how electronic and handwritten signatures compare for more background.
Can parents sign a permission slip on their phone?
Parents can sign with a finger on any touchscreen, because the Signature field works on phones as well as computers. If drawing feels awkward, set the field’s Input Method to Type and parents can type their name instead.
Can I make a digital permission slip with WPForms for free?
WPForms Lite can handle a simple version using its Checkboxes and Single Line Text fields, with a required consent checkbox and a line where the parent types their full name. Lite emails you each submission but doesn’t store entries in your dashboard.
The Phone and Date/Time fields start at Basic, and the Signature field needs Pro. If you’re collecting more than a handful of slips, Basic is the realistic floor, because that’s where entries get stored.
Can I make my own consent form?
The same steps work for any consent form, whether it’s a photo release or a permission form for a sports season. Change the consent wording, then swap the trip fields for whatever the activity needs.
How do I reuse a permission slip for the next trip?
Duplicate the form from WPForms » All Forms, then update the trip details and the Form Locker dates on the copy. Each trip then gets its own list of entries and its own deadline.
What if a parent can’t fill out the slip online?
Print the free template from earlier in this guide for those families, and keep their paper slips with your exported roster. You can also open the slip on a tablet at pickup so a parent can sign it on the spot.
Next, Build Your Summer Camp Registration Form
Once your permission slip template is working, summer camp sign-ups often come next. If you run a camp, our guide to building a camp registration form covers that side of the season.
And if you need a standing consent that covers a whole school year instead of one trip, you can create a parental consent form with the same builder.
Make Your First Digital Permission Slip! 🙂
Ready to build your form? Get started today with the easiest WordPress form builder plugin. WPForms Pro includes lots of free templates and offers a 14-day money-back guarantee.
If this article helped you out, please follow us on Facebook and Twitter for more free WordPress tutorials and guides.